How to make a DIY Christmas ornament
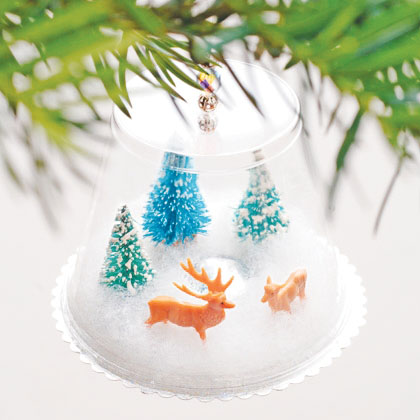
Materials:
- 9-ounce clear plastic cup
- Silver poster board
- Pinking shears or decorative craft scissors
- Polyester batting
- Miniature trees
- Miniature animals or people
- 1-inch-wide mirror
- Tacky glue
- Fine glitter
- Pushpin
- Monofilament
- Several craft beads
How to make it:
- Trace the rim of the cup onto the poster board. Cut out the circle, but do not cut exactly on the trace line. You want the base to be slightly bigger than the cup.
- Cut out a circle of batting snow the same size as the cup. Place this on the shiny side of the poster board.
- Separate or cut the batting where you want to place trees, figurines, and a mirror pond. Glue the base of each item to the poster board. Smooth or fluff the batting if needed. Sprinkle glitter on top of the scene.
- Use the pushpin to poke a hole in the middle of the base of the cup. Thread a 12-inch length of monofilament or clear thread through a craft bead. Gather the ends together, so the bead falls to the center of the line, and thread it from the inside of the cup. Add a few more beads onto the double line. Tie the end to form a loop.
- Apply a line of glue along the trace line on the poster board circle. Press the cup, upside down, on the glue and hold it in place for 20 seconds or so. Let it dry for 10 minutes, checking every now and then to make sure the cup is glued. If not, apply some more glue and let it dry. Let the cup dry for a day before hanging it on your tree.
DIY idea courtesy of Spoonful
About the Contributor

Carina Chu, Arts Editor
During her junior year, Carina was handling the 400+ subscriptions as the Circulation Manager. She is now enjoying her senior year as one of the Arts Editors!...